從事跟Android, Linux這類Open Source開發的朋友們一定對浩瀚龐大的原始碼有種莫名其妙的自信和挫敗,這種來自於你可能解了一堆問題,但回頭看又對更多問題束手無策的矛盾...。這就是缺乏系統性的了解,在開放原始碼的領域,的確很少有人願意把道理講得很清楚,因為一切都在程式碼之中。筆者很久沒寫專業書籍了,偶然機會看到這兩本書還覺得不錯,還真想推薦一下,初學、進階、深入的都可以。
書名:深入淺出Android系統移植與開發測試
ISBN: 978-986-201-474-5
這本書有系統化地清楚講解Android 底層的概念,比起你去看谷歌那些網站簡潔且充足許多。
書名:王者歸來-Linux驅動程式開發權威指南
ISBN:9789866143519
這本書名有點臭屁,但的確把Linux驅動程式基本知識和實作講得淺顯易懂,背景知識也夠齊全完整。
2011年6月26日
2011年3月7日
Trace Android Source Example
If we want to port Android source to a new board, reading Google porting guide is a good start. Following the guide and tracing the code together is a cost-efficient method.


Not easy but not hard, just need to take time... enjoy
Here is a good example to understand "How Android Porting works?" We'll use ORDOID-7 as an example. Here you can download the source code http://www.hardkernel.com/ . The board is Samsung S5PC110 1GHz ARM-Cotex A8 core.
Go to official web site: http://source.android.com/porting/build_new_device.html and compare your source code.
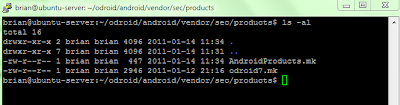
At Point #3 to #5 "Create a product-specific makefile, called vendor/<company_name>/products/<first_product_name>.mk, that includes at least the following code:"
Study odroid7.mk file and check with "Product Definition Files" table in Google's page.
e.g. PRODUCT_PACKAGES means "Lists the APKs to install."
PRODUCT_PACKAGES := \
IM \
ImProvider \
VoiceDialer \
SpeechRecorder \
Gallery3D \
LiveWallpapersPicker \
LiveWallpapers \
VisualizationWallpapers

The AndroidProducts.mk to include .mk

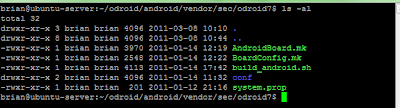
#6 "Create a board-specific directory beneath your company directory that matches thePRODUCT_DEVICEvariable<board_name>referenced in the product-specific make file above." Here the PRODUCT_DEVICE = odroid7

Not easy but not hard, just need to take time... enjoy
2011年2月8日
Basis of GIT server
If you are the construction manager or IT engineer, you will need to service developers to access GIT server. Here's a good article for reference.
Reference: http://yuanfarn.blogspot.com/2010/08/debian-ubuntu-gitosis-git-server.html
1. Install gitosis
2. add user git
$ sudo adduser --system --shell /bin/sd --gecos 'git version control' --group --disabled-password --home /home/git git
3. Generate a key
$ ssh-keygen -t rsa
4. initial server by this key
$ sudo -H -u git gitosis-init < /tmp/id_rsa.pub
$ sudo chmod 755 /home/git/repositories/gitosis-admin.git/hooks/post-update
5. download gitosis-admin.git using git
$ git clone git@YOUR_SERVER_HOSTNAME:gitosis-admin.git
6. switch to the gitosis-admin folder, and copy the SSH key into the keydir folder.
7. Add a new project "Hello" by edit gitosis.conf
+[group]
+writable = hello
+members = online@local
8. commit to repository
$ git commit -a -m "your comment here...."
$ git push
9. implement your Hellop project
$ mkdir hello
$ cd hello
$ git init
$ touch README
$ git add .
$ git commit -a -m 'initial version'
$ git remote add origin git@server_name:hello.git
$ git push origin master
Construct Android team build repository
Developing an Android based device is not a simple task, and usually need a team to work together. Some members handles kernel drivers and BSP, some for HAL and middle ware, and others for framework and applications. There're some tools to simplify those daily complex jobs, e.g. Apache Marven for project management and Hudson for continues integration. There's a good article to introduce such environment by Kamil: http://novoda.com/2010/08/13/android-continuous-integration-android-maven-plugin/
For a small team, it may too overloaded or you may not want to learn so many tools. So in this article, I'll try to construct a simple and easy to use environment for starters.
1. Install git-daemon
git-daemon is a really simple server for git repositories. It listens to TCP port "DEFAULT_GIT_PORT" aka 9418.
$ sudo apt-get install git-daemon-run
Check if the git service running:
$ grep 9418 /etc/services
git 9418/tcp # Git Version Control System
If you want to stop git-daemon, type:
$ sudo sv stop git-daemon
2. Modify the settings from the script:
$ sudo vi etc/sv/git-daemon/run
#!/bin/sh
exec 2>&1
echo 'git-daemon starting.'
exec chpst -ugitdaemon \
/usr/lib/git-core/git-daemon --verbose --export-all --base-path=/var/cache/git
where --export-all to export all directory under the --base-path /var/cache/git
From network client side, it is a mapping from git://server ip addr/ to /var/cache/git
You can add to a network service, so when the server reboot it will run automatically:
Ubuntu 10.04: cop the file of /sv/git-daemon/run to /etc/init.d
3. Mirror codes from source.android.com
$ mkdir /var/cache/git/android-mirror/
$ chown git.git /var/cache/git/android-mirror/
$ chown git.git /var/cache/git/android-mirror/
$ cd /var/cache/git/android-mirror
$ repo init -u git://android.git.kernel.org/platform/manifest.git --mirror
$ repo sync
$ repo init -u git://android.git.kernel.org/platform/manifest.git --mirror
$ repo sync
You're starting to download the source codes from Google site. This will take several hours depending on the bandwidth.
4. Build your local repository
$ mkdir /var/cache/git/our-android
$ cd /var/cache/git/our-android
$ repo init -u git://server address/android-mirror/platform/manifest.git --mirror
You need modify the remote server address in .repo/manifest.xml
$ vi .repo/manifest.xml
<?xml version="1.0" encoding="UTF-8"?>
<manifest>
<remote name="korg"
fetch="git://android.git.kernel.org/"
to
<?xml version="1.0" encoding="UTF-8"?>
<manifest>
<remote name="korg"
fetch="git://server address/android-mirror/"
then sync again:
$ repo sync
5. Select a branch, 2.3.1_r1 for example, for your team development
a) Download android-2.3.1_r1
$ mkdir my-android
$ cd my-android
$ repo init -u git://server address/our-android/platform/manifest.git -b android-2.3.1_r1
This will request you to enter name and email address.
After finishing init, modify the .repo/manifest.xml
-fetch ="git://android.git.kernel.org/"
+featch="git://server address/our-android/"
then sync the branch codes:
$ repo sync
b) start the branch master for development
$ repo start master-2.3.1_r1 --all
c) set remote repository nick name to my-korg
$repo forall -c 'git remote add mykorg /pub/gittrees/our-android/ $REPO_PROJECT.git $@'
If you want to remote myorg, can be done by: $repo forall -c git remote rm myorg
d) subnit to public repository
$ repo forall -c git push mykorg master-2.3.1_r1:refs/heads/master-2.3.1_r1
May need a "sudo" for access right.
$ repo sync
e) create a manifest branch for the public version
$ cd my-android/.repo/manifests
$ git checkout -b master-2.3.1_r1
$ vi default.xml
modify:
<manifest>
<remote name="korg"
- fetch="git://android.git.kernel.org/"
+ fetch="git://172.20.158.5/our-repository/" review="review.source.android.com" />
- <default revision="refs/tags/android-2.1_r2"
+ <default revision="refs/heads/master-2.1_r2"
remote="korg" />
<remote name="korg"
- fetch="git://android.git.kernel.org/"
+ fetch="git://172.20.158.5/our-repository/" review="review.source.android.com" />
- <default revision="refs/tags/android-2.1_r2"
+ <default revision="refs/heads/master-2.1_r2"
remote="korg" />
Commit the branch to public repository:
$git commit -a
$git remote add our-android /pub/gittrees/our-android/platform/manifest.git
$git push our-android master-2.3.1_r1:refs/heads/master-2.3.1_r1
$git push our-android master-2.3.1_r1:refs/heads/master-2.3.1_r1
The team development repository is done now. It's path is: /pub/gittrees/our-android/
Team member can check out the code by visiting git://your-server-ip/your-repository/platform/manifest.git
$repo init -u git://server address/our-android/platform/manifest.git –b master-2.3.1_r1
---
How to compile a kernel on Ubuntu 10.04?
Ubuntu 10.04 is a LTS version, it's good for server or as a build server for developers. Sometimes, we want to optimize Linux kernel for the server for performance consideration. Here's a good tutorial for reference:
http://linuxtweaking.blogspot.com/2010/05/how-to-compile-kernel-on-ubuntu-1004.html
訂閱:
文章 (Atom)